If you’re a Shopify user looking to offer the conversion increasing shopping benefits of BuySafe to your shoppers, look no further than our easy to use Shopify app. Installing the BuySafe app is quick and easy. This step-by-step Shopify app installation guide will help get you up and running with BuySafe in minutes.
Step 1: Install the BuySafe App
The first step in the process is to install the BuySafe app on your Shopify store and to create your BuySafe dashboard account
- From your Shopify dashboard, navigate to the Shopify app store and search for “BuySafe”
- Open the app listing and click the Add App button
- Next, you will be prompted to review the various permissions the BuySafe app requires. If you agree, click Install app on the bottom right side of the page. (fig. 1)
- The BuySafe dashboard will open in a new tab. Check the box to agree to BuySafe terms and conditions and click Submit
- Check the email address associated with your Shopify account for an email from BuySafe containing your temporary account password.
- Enter your temporary password and type & confirm a new password in the BuySafe dashboard, then click Save
- Enter your business address and contact phone number and click Next
- Now you will confirm your store name, url and customer support email address. Finally, we ask for an estimate of your site’s gross monthly sales in order to calculate your estimated monthly pricing. After entering this info, click Next.
- Next, we will display a summary of your estimated monthly charges. If you agree to these charges click Submit.
- As a last step, you will be redirected back to the Shopify dashboard to approve the subscription charges. You will be billed for your BuySafe usage every 30 days by Shopify. Click Approve subscription to complete your account creation.
Step 1: Install the Sitewide Trustmark
Now that your BuySafe account has been successfully created, you will need to take the first step to install the BuySafe shopping guarantee code on your site. This will allow us to display our sitewide trustmark to shoppers on the bottom left corner of all the pages of your store (except checkout pages). Additionally, this code allows us to see when you make a successful sale so that we can issue a BuySafe shopping guarantee to your customer.
- The first time you visit your BuySafe dashboard, you will receive a welcome message. Click Let’s Get Started.
- Select your ecommerce platform from the drop down menu.
- Follow the instructions to install your secure BuySafe Seal Code, then click Next.
- Follow the required steps to install your Guarantee Code, then click Next.
Note: It may take a few minutes for the trustmark to appear or disappear from your site after you click the install or uninstall button in Step 1.
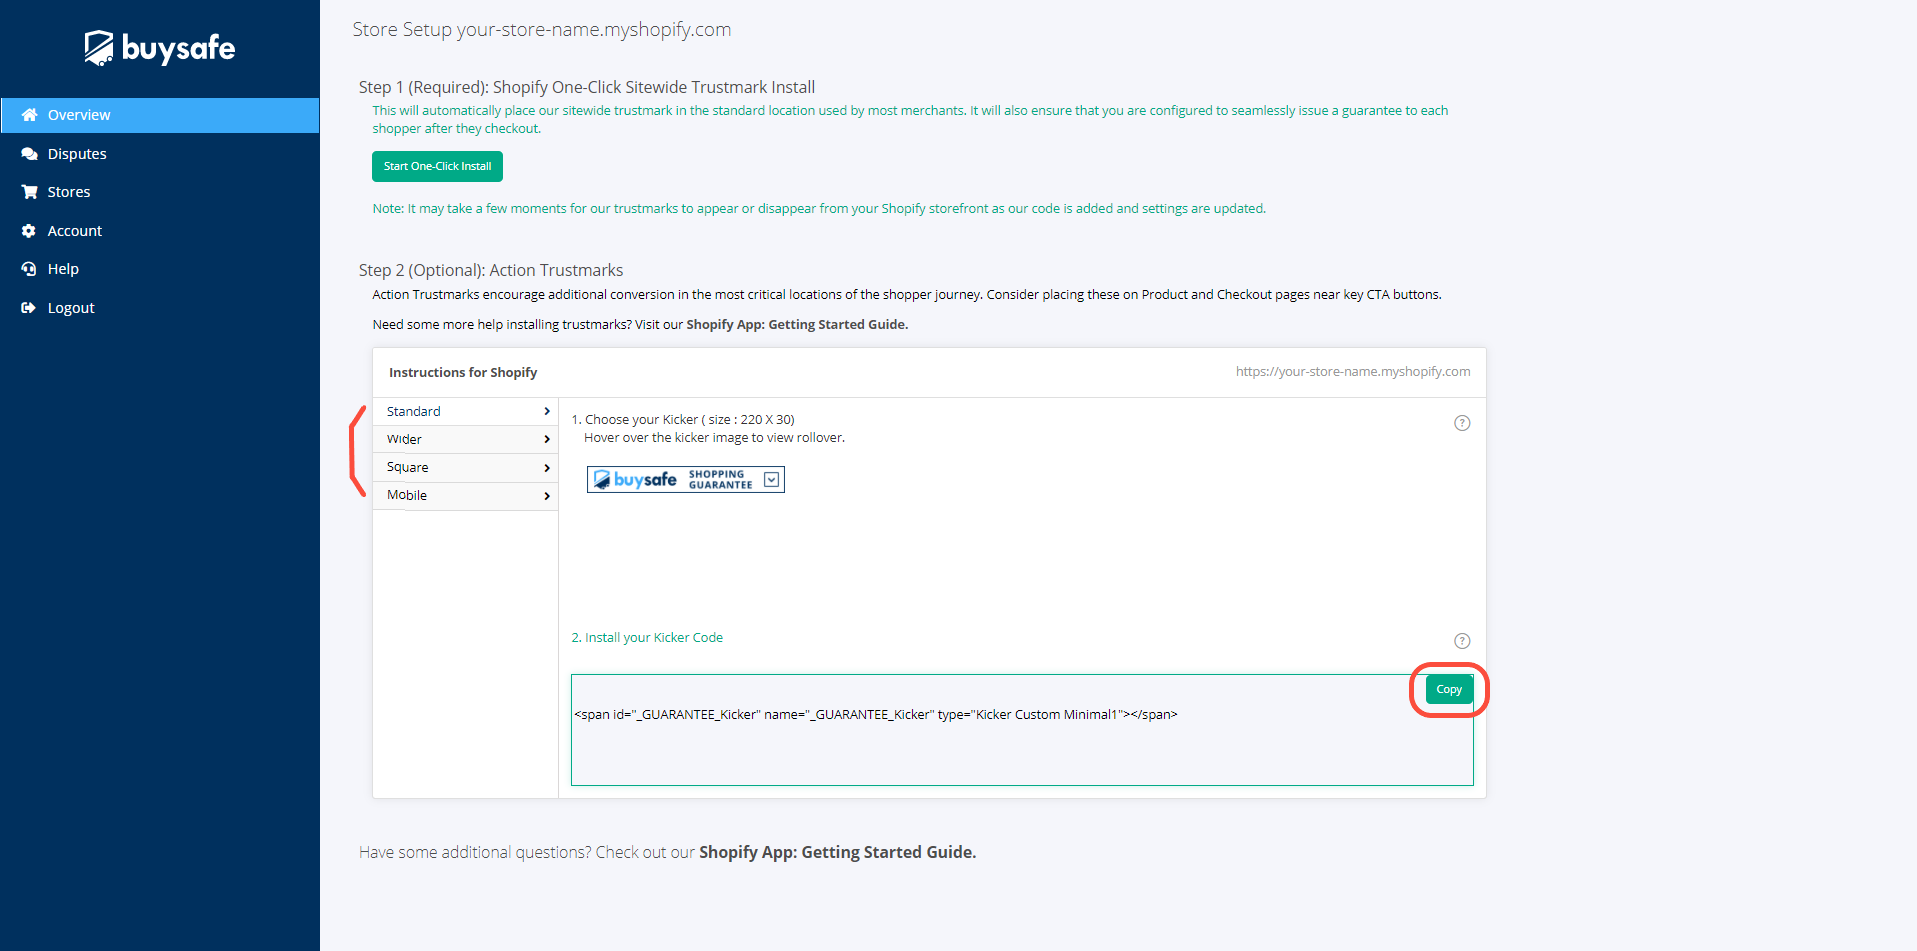
Step 3 (Optional): Install Action Trustmarks (aka. Kickers)
In addition to the sitewide BuySafe trustmark, our optional (but highly suggested) action trustmarks help to reinforce the value of BuySafe to convert shoppers at critical points in the purchase process. We recommend placing action trustmarks on product pages near “Add to Cart” buttons and in the shopping cart near the “Submit” or “Checkout” buttons.
- Select the action trustmark design you want to use.
- Copy the span tag code so you can paste it later. (Fig 11. – Copy Trustmark Code)
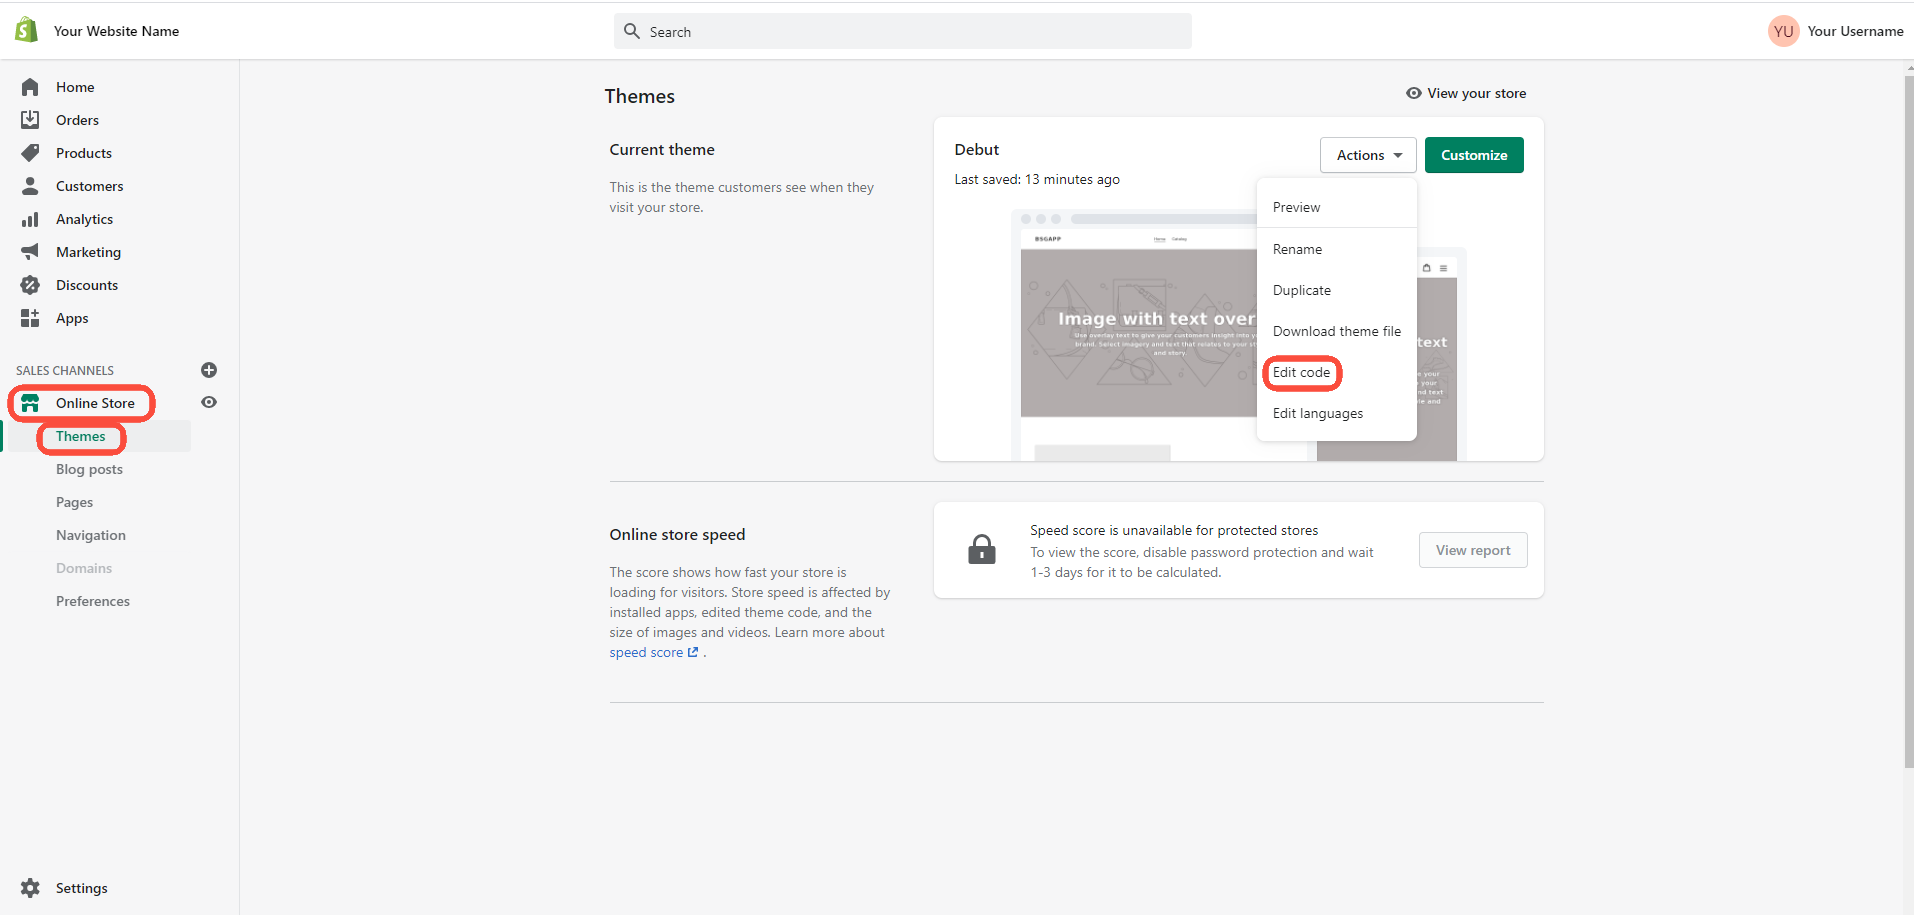
- Log in to your Shopify store account.
- In the left hand navigation, select Online Store, then click on Themes.
- In the “Current theme” section, select go to the Actions drop down menu and select Edit code. (Fig 12. – Initial Navigation)
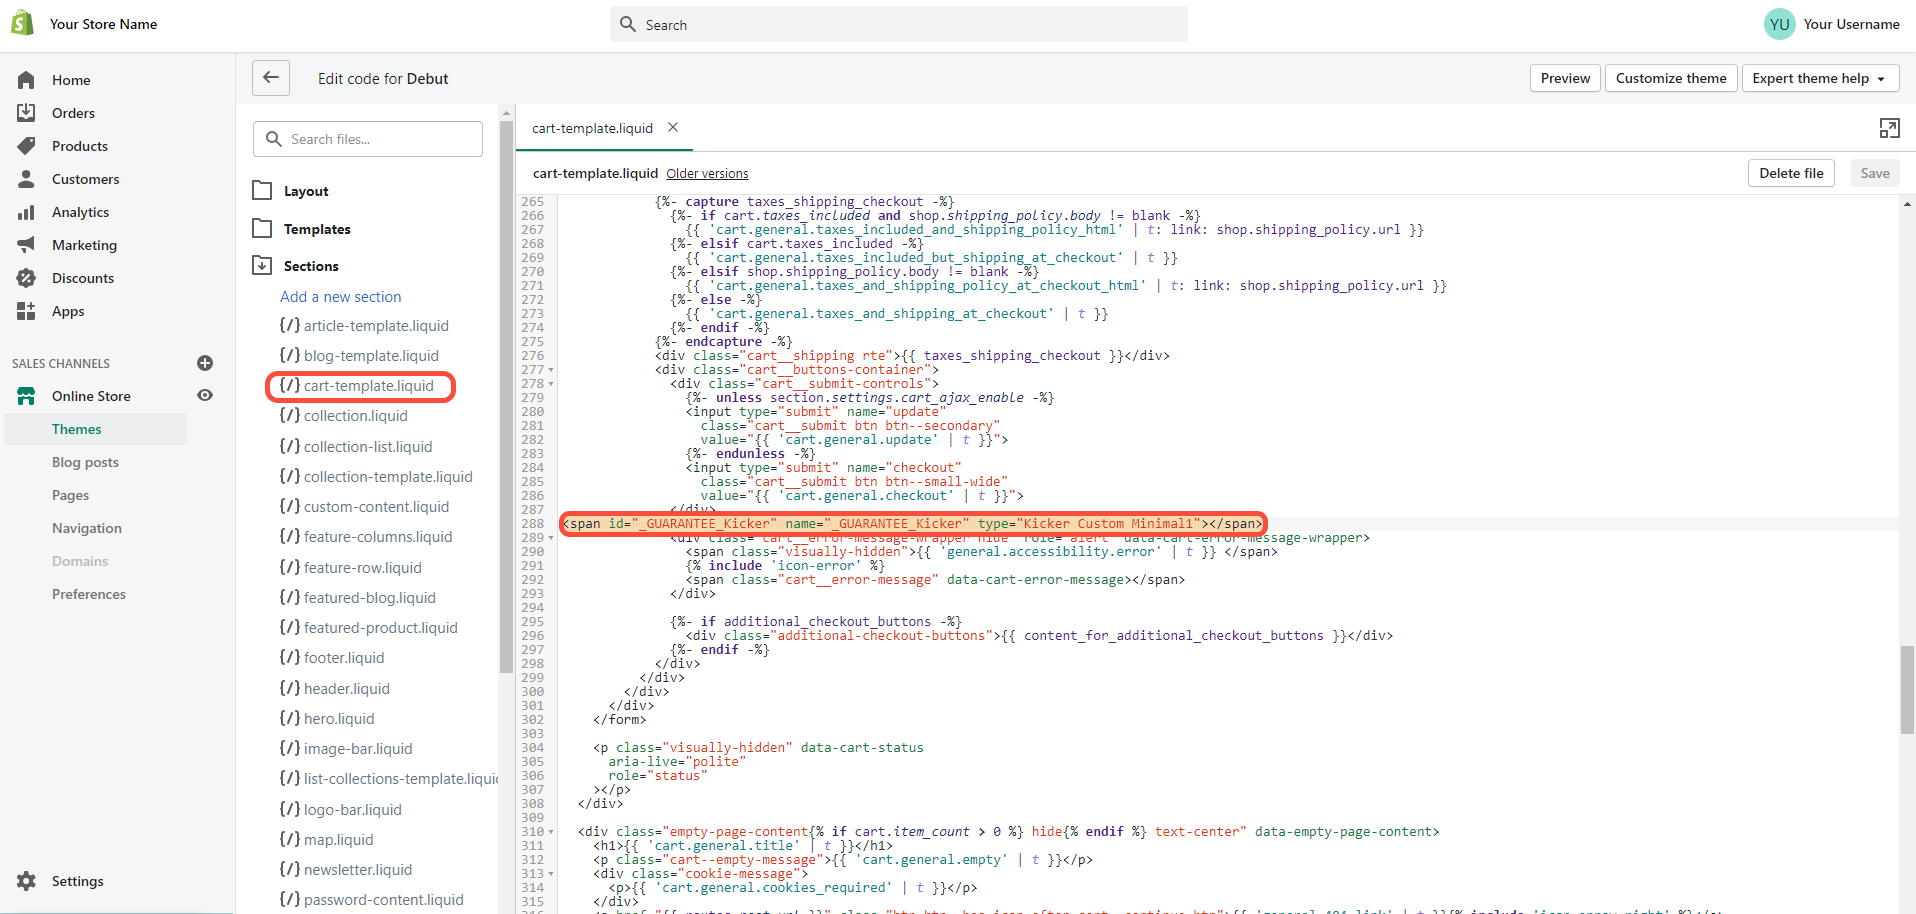
Putting action trustmarks on the cart page:
- On the cart page, you will want to place the BuySafe action trustmark near or immediately after the “Checkout” button.
- Search for the cart.liquid file found in the “Templates” directory or the cart-template.liquid file found in the “Sections” directory.
- Typically, it would be best to place the span tag code that you copied in Step 2 immediately following the closing </div> after the “Checkout” button.
- See screenshot for an example on a site using the Shopify Debut theme.
- Press Save in the upper right hand side of the screen when you are done making edits.
- After previewing the action trustmark on a product page on your site, you may want to go back to the same file and add some additional padding, alignment, or other CSS to adjust the trustmark to exactly where you want it. (Examples of how to implement CSS can be found here)
Note: The specific location of the “Checkout” script can vary from theme to theme. The location of the “Checkout” button on your theme may be different from our example of a store using a basic Shopify Debut theme.
<!-- BuySafe Trustmark -->
<script type="text/javascript" src="//guarantee-cdn.com/Web/Seal/gjs.aspx?SN=########"></script>
If you have other add-ons on your product pages near the call to action buttons, you may consider placing the BuySafe action trustmark somewhere near the “Add to Cart” button, but not immediately after. Use your judgement on what looks best for your specific product pages. (Fig 14. – Add Trustmark to Cart Pages)
Putting action trustmarks on product pages:
- On product pages you will typically want to add action trustmarks immediately after “Add to Cart” buttons.
- To do this, open the product.liquid file found in the “Templates” directory. (Can’t find product.liquid file? Look for product-template.liquid file instead.)
- Look for the “Add to Cart” script and paste the span tag code that you copied in step 2 immediately after the closing </script> or {% endform %} line following the add to cart button.
- See screenshot for an example using the “Debut” theme.
- Press Save in the upper right hand side of the screen when you are done making edits.
Note: The specific location of the “Add to Cart” script can vary from theme to theme. The location of the “Add to Cart” button on your theme may be different from our example.
If you have other add-ons on your product pages near the call to action buttons, you may consider placing the BuySafe action trustmark somewhere near the “Add to Cart” button, but not immediately after. Use your judgement on what looks best for your specific product pages.
Putting action trustmarks on the cart page:
- On the cart page, you will want to place the BuySafe action trustmark near or immediately after the “Call to action” button.
- Search for the cart.liquid file found in the “Templates” directory or the cart-template.liquid file found in the “Sections” directory.
- Place the span tag code that you copied where you want it to appear on the cart page.
- See screenshot below for example.
- Press Save in the upper right hand side of the screen when you are done making edits.
Note: Keep in mind that every Shopify theme is different and your theme may vary from our example.
Step 4 (Optional): Complete your Business Transparency Profile
Your BuySafe business transparency profile is a unique way for you to put important information about your business in front of shoppers and key conversion points on your site. If a shopper clicks on any BuySafe trustmark, your key policies, contact info, ratings & reviews and other business info are displayed alongside an explanation of our shopping guarantee service. To enable this feature, you will need to complete your business transparency profile in the BuySafe dashboard.
- Navigate to the Stores tab on the left hand side of your BuySafe dashboard
- Click Edit next to the name of the store you wish to setup
- Select the Store Policies tab from the top navigation menu
- Here you can choose what features of your store you want to highlight in your pop-up. If you leave all of the fields blank on a tab, the tab will not show up in your pop-up and if you fill out some of the fields, it will show only the completed fields. You can click the ‘Preview’ toggle in the upper right-hand side to preview how your pop-up will look before clicking save at the bottom of each tab.
<!-- BuySafe Trustmark -->
<script type="text/javascript" src="//guarantee-cdn.com/Web/Seal/gjs.aspx?SN=########"></script>
Note: Should you choose not to complete your business transparency profile, a standard pop-up still appears to shoppers that click on any of our trustmarks on your site to explain the BuySafe shopping guarantee protections that your site provides to all purchasers.
Congrats! You’re all setup and ready to offer the best shopping experience to your customers with added BuySafe protections.
Have some more questions? Contact Us and our support team will be happy to help.

Fig. 1

Fig. 2